Multires Mesh
Multires meshes are meshes designed for the purpose of sculpting, these meshes allow higher densities than "Editable" meshes while using less memory.
These meshes allow sculpting on them at different levels, allowing bigger changes when working on lower levels and more "detailed" changes at higher levels of subdivision.
These meshes can also be "Remeshed" this feature allows re-creating the existing mesh form, but with an evenly distributed quad topology.
The mesh properties menu allows you to apply different operations on the selected mesh. This menu can be accessed via the "Selection" button in the "Top Menu" bar.
Mesh menu toolbar
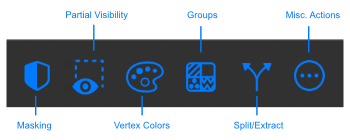
- Modify Mask: Shows a menu with the following options:
- Clear: Removes the mesh masking from the currently selected mesh.
- Invert: Inverts the mesh masking from the currently selected mesh.
- Soften: Softens the mesh masking from the currently selected mesh.
- Sharpen: Sharpens the mesh masking from the currently selected mesh.
- Grow: Grows the mesh masking from the currently selected mesh.
- Shrink: Shrinks the mesh masking from the currently selected mesh.
- Modify Partial Visibility: Shows a menu with the following options:
- Hide Masked: Hides any faces that may be masked.
- Hide Unmasked: When pressed with an active mask, this will hide any faces that were not masked.
- Invert: Inverts the visibility of the mesh.
- Reset: Shows the entire model.
- Vertex Colors: Shows a menu with the following options:
- Fill With Color...: Fills the given mesh with the color selected, this action will factor in masking.
- Import From Image...: Reads vertex colors from the selected (square) image.
- Export To Image...: Exports vertex colors to image.
- Modify Groups: Shows a menu with the following options:
- Group Visible: Creates a group only with the visible part of the mesh.
- Group Masked: Creates a group with the masked area of the mesh.
- Group By Submesh: Creates groups in the mesh based on edge/face connectivity.
-
Split/Extract Submeshes...:
- Extract mask with thickness: Extracts a mesh from the selected meshes mask with the specified thickness (useful for clothes, props etc).
- Split by submesh: Splits the input mesh by edge/face connectivity.
- Split masked: Splits the input mesh into different meshes, leaving all masked faces in the current mesh and moving all unmasked ones into a newly created mesh.
- Split visible/hidden: Splits the input mesh into different meshes, leaving all visible faces in the current mesh and moving all invisible ones into a newly created mesh.
- Delete hidden: Deletes any partially hidden faces.
-
Misc. Actions:
- Auto retopo...: Creates a quad dominant auto retopology of the current mesh whose edges make their best to follow the extrinsic flow of the input mesh. You can specify a target base face count, after creation the mesh is automatically subdivided and reprojected (if there is enough memory available) onto the old mesh in an attempt keep details.
- Close holes: Uses a naive algorithm that caps all of the mesh holes by placing a vertex in their center and creates triangles connected from this vertex to the bondary edges of the original holes.
- Generate automatic UVs: Creates automatic UV coordinates for the selected mesh.
- Import UVs from OBJ...: Allows importing UV coordinates from a specified OBJ, the OBJ must have the same amount of vertices as the lowest subdivision level, and they must be in the same vertex order.
- Mesh Projection...: Allows projecting the points of the mesh over other(s).
- Bake Transform: Applies the node transform to the mesh.
Geometry
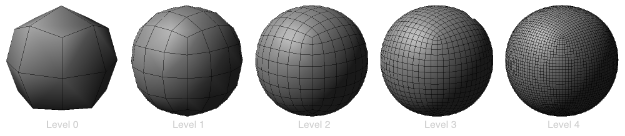
This section controls the amount of detail that can be sculpted onto a mesh, the higher the number of faces/vertices of a model, the more detail can that can be sculpted.
Pressing Subdivide will increase the resolution of the model by multiplying the number of faces by four, whilst keeping the previous (coarser) version of the mesh as another sublevel, note that it is possible to step up/down existing levels at any time.
Note
Before subdividing Forger will check if there is enough memory available and will bail out if it finds that there is not enough if this happens and the mesh resolution is still at a moderate level, closing background apps might help.
When working with multiple resolution models, you will find it easier to step down to coarser levels to do big form changes and step up to higher ones to do finer detail edits. Forger will automatically propagate any changes (positions, masks, visibility) done to each level to other levels.
- Sublevel: If a model has multiple resolutions, you will be able to step up/down one level at a time by using this slider.
- Delete Highest: Deletes the highest sub-level (active only when the current sublevel isn't the highest).
- Delete Lowest: Deletes the lowest sub-level (active only when the current sublevel isn't the lowest). Deleting unnecessary levels can help out freeing memory.
- Rebuild Sublevel: If a mesh was previously subdivided in another software and imported into Forger their sublevels can be rebuilt by pressing this button. This button rebuilds one sublevel at a time and it’s safe to press until there are no more levels left to rebuild.
Remeshing
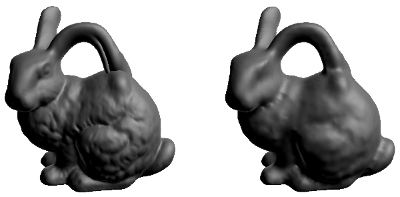
This feature allows you to sculpt and to re-create your model's topology on the fly as you work, it’s meant to be used mainly for concept sculpting as it modifies the topology.
- Resolution: This slider defines the resolution of the intermediate volume used for remeshing, the higher the value the more accurate the projection will be (and the slower the remeshing process).
- Remesh: Starts the remeshing process.
Warning
This quick remeshing method creates entirely new geometry and thus will remove any UVs the original model may have.
Symmetry

This section controls the way that Forger deals with symmetry on the selected model.
In order to sculpt a model symmetrically, choose an axis and any edits that are done on one side of the mesh will be replicated on the other side of the mesh along that axis. This assumes that the originating mesh is somewhat symmetrical. If the original mesh was symmetrical but has been "posed", read on for symmetrical topology support.
There is support for posable symmetry, when working with meshes that have been "posed" in external software, you can still work on them symmetrically provided that these meshes are topologically symmetrical, in order to enable this, you must go to the lowest sublevel, mask (with the MaskBrush) only two contiguous adjacent vertices along the topological axis and press "Scan Topological". If this is successful, you should be able to set the mirror axis to T (tangent) and sculpt symmetrically even if the model is posed.
- Symmetry Axis: Axis to use for symmetry, choice between (Off, X, Y, Z, and Tangent).
-
Scan Topological: Scans the model for topological symmetry (only active whilst the lowest level of a mesh is active).
-
Enable Topological: If topological symmetry was scanned and found, this allows using it.
-
Reapply Symmetry: If the model is topologically symmetrical and the symmetry axis can be found trivially, this allows reapplying the symmetry (only active whilst the lowest level of a mesh is active).
-
Mirror: Flops the current mesh across a given user-specified axis.
-
Make Symmetrical...: This feature allows users to forcefully make a mesh symmetrical again, it will internally slice, duplicate, mirror and merge the two halves. It differs from "Reapply Symmetry" in that it modifies the topology, or at the very least the point order. This can also be used to make meshes symmetrical that were never symmetrical to begin with (e.g. creating a second eye for a character by having one in place).
There is a videotutorial on "Symmetry" in the videotutorials section.
Masking
Masks define how much tools can affect deformation. The more an area is masked, the less it will be affected by tools that factor in masking. In general all sculpting tools will respect masking.
Masked areas in meshes will be visually darker than unmasked areas.
You can mask meshes by using the MaskBrush, the masking shortcut or using screen space masking shortcuts.
There is a videotutorial on "Masking" in the videotutorials section.
Partial Visibility
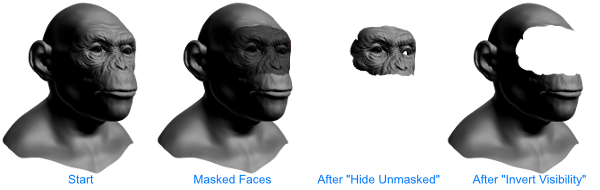
Sometimes it's useful to hide parts of a mesh to get better performance or get access to otherwise hard to reach areas, this feature allows you to do so.
There is a videotutorial on "Visibility" in the videotutorials section.
Face Groups
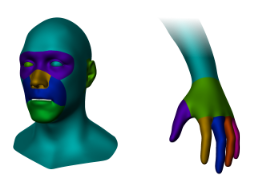
Face groups allow having some form of persistent "selections" of faces that can then be used for various actions (although they are used primarily in combination with "Partial Visibility").
It is common to use face groups to represent different "selections" of parts of a mesh that may need to be worked on in isolation, or may tend to require masking (e. g: arm groups, leg groups, per-finger groups, upper lip group/lower lip group).
These groups are transferred across sublevels and will tend to follow the minimum common denominator for face groups (usually set at the lowest subdivision level of a MultiresMesh mesh). This means that if a meshes face is in one group its 4 child faces once subdivided will be part of the same group and so on.
There is support to import/export groups in the OBJ format through the "polygon group" tag of the format.
Face groups are represented by a set of random unique colors that identifies each group (visible by using the Colors > "Group" choice in the display menu), the colors only purpose is to visually identify groups.
Note
Please note that vertex colors are used to visually represent groups which results in the borders of these groups not being super-defined (due to linear interpolation across vertices of each triangle) but the faces themselves are either in one group or another, they can't be in more than one at the same time so the partially interpolated values around the borders of the groups aren't completely truthful to the underlying data.
Vertex Colors
Vertex coloring allows for a simple and straightforward way of coloring meshes without requiring an additional set of coordinates.
Whilst this simplicity also translates in reduced opportunities for color variation inside triangles when compared to texture painting (also available in Forger via In-App Purchase), it does allow for greater flexibility at the time of sculpting, it is specially useful for concepting.
Forger will automatically remap colors on sub-level change and on remeshing, vertex colors are affected by masking.
Note
Vertices have a pure white color by default, before starting to paint, it is recommended that users change the material of the mesh about to be painted to a white color since vertex colors are multiplied by the material color, this will allow users to paint and view models properly.
ie: if the material applied to a mesh is pure green, and we paint the model red the model will not appear red, will appear black, as our "red colors" will only allow the "red" color to go through but in the case of a pure green color there won't be any red, resulting in a black color. If we change the material color to white, or in the case of a LitSphere we change to a Blinn/Standard or a white LitSphere, our painted red will appear.
Other
- Bake Transform: Applies any (old school, prior to v1.6.20) transforms made to the model. Note that this action will flush the undo history.