Interface
Start Menu
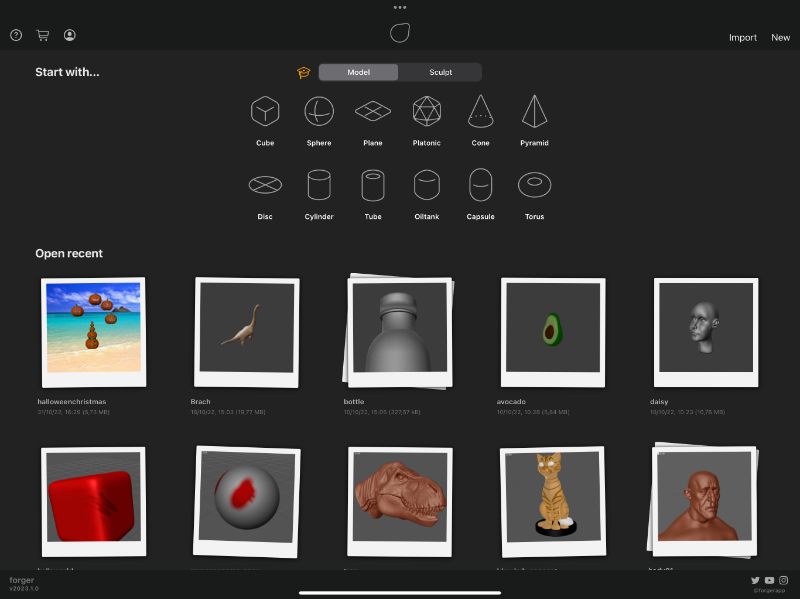
This menu shows up every time that Forger starts up.
It allows you to open previously saved scenes or start with one of the five built-in template scenes (plane, cube, sphere, bust, human).
You can also choose the "New" option to start from a fresh scene, or start a scene with imported geometry by choosing "Import".
Overview
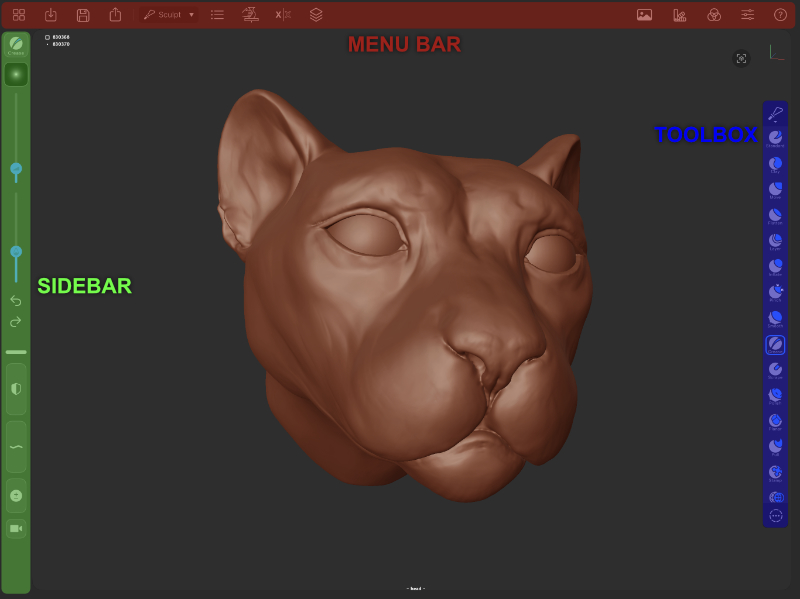
Forger gives access to all functions through the top menu bar.
Menu Bar
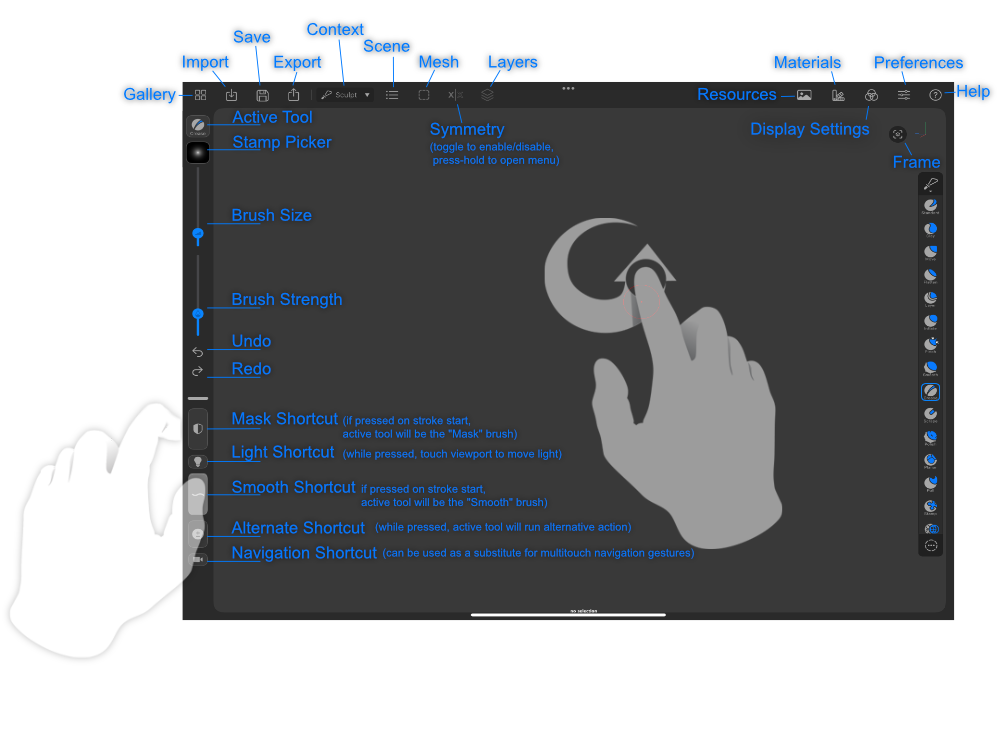
- Gallery: Goes back to the "Start Menu".
- Import: Allows you to import 3D models, stamps, images, materials, or IBLs. (See Import)
 Save: Allows you to save your scene, save incrementally or save as some new name. If you tap-hold, it will run a "Save" action. (See Save)
- Export: Allows you to export 3D models, textures, or "renders". (See Export)
- App Context: Allows you to change the application context.
- Model: Polygonal modeling app context.
- Sculpt: Sculpting app context.
- Object List: Lists the contents of your scene.
- Selection Menu: Where you can run various operations on your selection. (If you tap-hold, in "Sculpt" context, it will run a "Remesh" action).
- Symmetry Menu: Allows you to do various operations that have to do with symmetry. If you tap-hold, it toggles symmetry on/off.
- Layers Menu: Lists the layers of your current selection (In "Sculpt" context).
- Resources: Contains references previously imported.
 Materials: Lists the materials of the scene, and allows you to create and modify them.
  Display Settings:
- Grid: Allows you to toggle the display of the viewport grid.
- Wireframe: Allows you to toggle the display of the wireframe.
- Backface Culling: Allows you to toggle the drawing or not drawing of back-facing polygons.
- Shading: Allows you to adjust the viewports display mode.
- Smooth: Draws objects with smooth shading (per-pixel interpolated normals)
- Faceted: Draws objects using constant normals across each facet or co-planar surface
- Constant: Draws each object in its raw form, without using any lighting contribution
- Colors:
- None: Disables vertex colors.
- Vertex: Displays vertex colors.
- Group: Displays face groups as vertex colors.
- Unselected Display Mode: Allows you to choose how to shade objects that are not selected.
- Normal: Does not make any difference between the selection and the rest.
- Darker: shows unselected modes slightly darker than the selected one so they are easier to tell apart.
- Transparent: Will make non-selected objects transparent. (Useful for example for placing eyes inside a head).
- Hide: will hide anything that isn’t selected. (Some applications call this “Isolate selection” or “Solo”).
- Preferences: Allows you to configure Forger to your liking.
- Help: Gives you quick access to various forms of documentation.
Toolbox

The toolbox gives quick access to all available tools for the active context (sculpting/painting).
By dragging it from its handles, you can dock it to any edge of the screen (top/bottom/left/right).
Once it's docked, the toolbox can also be partially hidden by dragging it to the nearest edge of the screen, this helps in cases where it could get in the way.
Tapping on any toolbox button will change the active tool to the selected one.
Tool buttons within the toolbox can be rearranged by tap-holding and dragging them around.
Viewport
The viewport is where all of the action happens, users can navigate in 3d, sculpt meshes and paint by interacting with it.
The current selections name is displayed at the bottom center of the view.
In the sculpting context, the top left of the view displays some information (polycount) of the currently selected mesh, if any.
Sidebar
The SideBar gives handy access to some of the current tool settings as well as having shortcuts.
Sculpting Tool Settings
The sculpting context settings expose the most commonly adjustable settings or shortcuts that you might need to access during sculpting, they consist of the following:
- Active Tool: It shows the tool that is been used. If you tap it, it will show you the parameters of the tool. If you long-tap it, it will show the tool picker.
- Tool Stamp: This represents the active stamp that the active tool will use. You can change it by tapping on it and choosing one from the Stamps popover that will show up.
- Tool Size Slider: Use this to adjust the active tools size.
- Tool Strength Slider: Use this to adjust the active tool's strength.
- Mask "shortcut" Button: Press this button while touching the viewport to adjust the masking of the selection, combining this shortcut with various gestures you can quickly create, invert, clear, soften and sharpen masks using the masking brush or screen-space mask-selection tools. (For more details see iOS Integration section).
- Light "shortcut" Button: Press this button while touching the viewport to adjust the default lights placement and thus see your sculpts under different lighting conditions. (Experienced desktop users might recognize this as the "L" keyboard shortcut in Desktop sculpting applications.)
- Smooth "shortcut" Button: Press this while sculpting to temporarily switch the active tool to the "Smooth Brush". Two-finger tap to keep it pressed until is two-finger tapped again. (Experienced desktop users might recognize this as the "Shift" keyboard key modifier in some Desktop sculpting applications).
- Alternate "shortcut" Button: Press this button while sculpting to run the "alternate" function of the active brush. Alternate generally means opposite (ie: push/pull, in/out, etc...), although it may vary from brush to brush. Please read each Sculpting Tools documentation page for details on how the alternate mode affects their behavior. (Experienced desktop users might recognize this as the Alt/Ctrl keyboard modifier in Desktop sculpting applications.)
- Navigation "shortcut": This shortcut button allows moving the camera in the 3d scene without having to turn to using multitouch gestures, this can be helpful when using stylus or the Apple Pencil.
- Press Navigation + Touch viewport = "Pan" camera.
- Press Navigation + Touch viewport + Release Navigation = "Zoom" camera.
Tip
For a quick workflow, use the mask shortcut to do screen-area masking (by starting outside of a mesh) and combine with the "smooth" button to do quick screen-area visibility changes in selected meshes. Using the alternate shortcut in combination with the other two will make them do the opposite (unmask/hide)
Shortcuts Panel
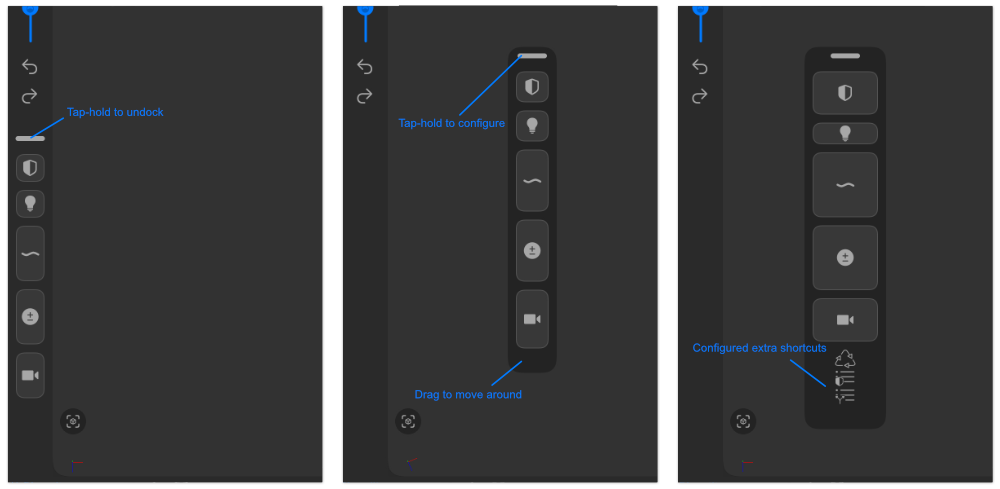
The shortcuts panel can be detached from the sidebar and placed anywhere in the viewport, it can also be configured to show buttons in your preferred order with customizable sizes and panel width, extra shortcut buttons can be added that will display when floating, finally its docking area can be set to the top/bottom.
When the panel is docked (on the sidebar), tap-hold the top grabber element to separate it. When the panel is undocked (floating around), you can interact with the top grabber element like so:
- Double Tap: To quickly dock the panel to the sidebar.
- Long Tap: To bring up the menu that allows docking or configuring the panel.
- Drag: To move around, if dragged over its docking area it will dock itself. Alternatively, the bottom section of the undocked panel also allows dragging.
Shortcuts Panel Configuration
Shortcuts
This section allows you to choose the order and the relative size (respective to others) of each button, simply choose their size and tap-hold & drag from the grabber handle to reorder the buttons.
Panel
- Docked Placement: Allows choosing whether the buttons are docked at the top or bottom of the sidebar. (Bottom by default)
- Undocked Width: Allows choosing different widths for the sidebar (this width only used when the panel is undocked).
Extra Shortcuts
This section allows setting up to 5 extra shortcut buttons that will be shown when the panel is undocked, to set any extra shortcut, choose one from the list, to remove it, choose "Off".
All shortcuts from the Context Menu are available to be added to the panel, including their parent menus.
Context Menu
The context menu allows doing different actions based on the app's active context (modeling, sculpting), it can be opened by doing a 4 finger tap on the viewport, or tapping on the "context menu" icon found in the toolbox.